Friday, January 27, 2012

products galore: warmboard revisited

if you recall we installed a product called warm board, here,  as our subfloor as well as an in floor heating system.  this 1" subfloor with a thin, 1/8" thick sheet of aluminum plate will be keeping our feet toasty warm once the house is complete.

the system was designed in several zones.  the first floor of the "north house" is one zone, the kitchen and great room two separate zones and the second floor of the "north house" a fourth zone.  the layout was such that we could build all of the interior structural walls before installing the tubing for the hot water to run through.  however, in order to be very efficient and heat each zone correctly a few of the non-structural walls had to wait until we could install the pex-aluminum-pex tubing.

we finally received the tubing yesterday and we were eager to install it.  first we had to really clean all of the areas where we were going do the installation. all of the grooves in the sub-floor  had to be free of debris to ensure that the tubing will not be punctured or damaged.

the tubing coming up from the floor to the manifold location

the loops of tubing can only be so long in order for the hot water to not cool down as it is running through the system, so that for example the second floor is one zone but is made up of three separate loops of tubing which go through the floor and then back up to the manifold location in a panel in the bathroom. matt and björn drilled holes in the floor for the tubing, and used a grinder to make sure the aluminum and wood around the holes was smooth in order to not puncture the tubing.

björn and matt installing the tubing


the manifold, which we haven't ordered yet,  regulates the water and tells the water heater to send hot water to a location.  we originally had designed the system so that all of the tubing met the manifold in the crawl space however not having the manifold above the level of the tubing can cause issues with air bubbles so we changed the location today as we were planning the final layout.

tubing installed in the warm board subfloor system, utilizing nailing plates
to hold it in place

the tubing is simply pressed into the grooves using a rubber mallet and in areas where it is having trouble staying put björn added a nailing plate to keep it in place.  today we finished all of the second floor tubing and we are planning on tackling the lower floor tomorrow.


this is a supply tube through going through the second floor 

the pex-aluminum-pex tubing must divert around the toilet, so that it
does not melt the wax ring

each tube is clearly labeled for return and supply for each loop, the manifold
will eventually be located here in this wall

supply and return tubing

we also made a dr. seuss hat out of some extra tubing 

deep in thought

Thursday, January 26, 2012

progress report: ive been lazy

i think both björn and i were suffering from the winter blues the last couple weeks.  i had a rough second week of the new year because of the passing of my grandmother, so i ended up going home for five days for the funeral.  but our life goes on here in durango, and despite feeling a little bummed for the last few weeks we have accomplished a lot.

building the front porch roof

matt nailing the osb to the roof framing
before going home björn and matt built the front porch roof and the boys put up the house wrap and ice and water shield.  house wrap is a pretty interesting material.  it protects the exterior sheathing of the house from moisture while still allowing water vapor to move to the exterior to dry out.  Big Sky R Control provided us with the house wrap as part of the SIP package, which was pretty awesome.  the ice and water shield made by tamko is a product that is applied to the roof to create a rubberized water barrier.  with that installed björn and i both felt that the weather was free to do whatever it wanted, we were dried in!


house wrap

björn heating the ice and water shield so that it will adhere properly

the day i left to go home to maryland we received our window order, these came from sierra pacific out of washington state.  before leaving for the airport we installed a few windows which was very exciting.  i was convinced that a divided light window was the way to go for our house.  we wanted to make sure the house had a traditional feel that was still very clean lined and simple.

putting in the first window- the dining room- applying caulk and flashing


after making sure the window is square and level björn screws the frame to the house

the view from the inside with our happy divided lights


flashing goes on the exterior of the frame as well

next is the transom window

while i was in maryland and björn was at work our awesome guys installed the rest of the windows, so that when we returned it was to a dry house.

we are well on our way to a real house!

with the windows installed and the house dried in we are now able to turn on our little propane heater and the house gets very comfortable to work in which is very nice!   i have more to update you on but that will have to wait for friday!


thank you to everyone who has asked about the blog in the last week, it makes me so happy to know that you guys find this interesting.  and i hope that i can get back into the groove of updating you on what we are up to out here in durango we are going to be getting into some very exciting things soon and i hope that you will continue to be interested!


Thursday, January 5, 2012

progress report: roof is on!

the roof is on! wednesday we successfully placed the last roof panels and we can officially say that we have a roof over our heads.  björn and i couldn't be happier, we were blessed with incredible weather this past week, it has been sunny, blue skies with temperatures in the upper 40's.  it has made working on the roof just fantastic.

one of the final panels

we are looking forward to a few days off, björn is off to his "real" job which these days is like a vacation to him compared to the hard labor of construction, and i am looking forward to meeting with a few people in town to start getting all of our finishes nailed down.  but for now here are a few pictures of the last few roof panels going up and the finished product!


working on the south side of the great room roof

björn driving his favorite machine- the skytrak

placing the last panel

its in place!  now just need to be secured!

the finished roof 


Wednesday, January 4, 2012

progress report: our roof is almost finished

 when we left for our little christmas break we had most of the wall panels in place as well as many of the huge douglas fir beams.  our roof panels were sitting around on the site just waiting to go up.  while i was back on the east coast björn worked on a few of the finishing details that needed to be completed before we could begin to "fly" the roof panels.

beam pockets on the second floor
the douglas fir beam on the second floor

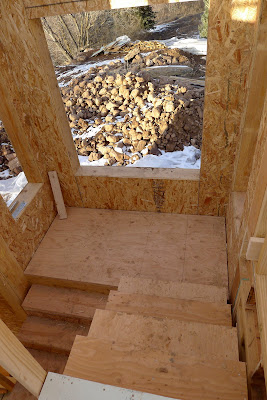
our newest crew member matt was instrumental in accomplishing many of these goals.  he built us a set us stairs so now getting up to the second floor is a breeze, he also finished all of the window openings and assisted björn in prepping all of the roof panels.

our stairwell

björn and the guys also built the loft while I was gone

under the loft is where the dining area will be
we began placing the roof on friday.  mark yerbic from big sky came down to assist us with the first few panels to make sure we were understanding everything.  the first panels to go on were the kitchen.  these consist of three panels for each side of the roof, which we assembled on the ground to make one large piece. the panel was then attached to the skytrak using a lifting plate.  this is basically a large plate that is screwed into the panel with a large strap attached.  björn then lifted the panel and moved it into place.  the guys are positioned to guide the panel and make sure it sits down in the proper location.

Attaching the roof panel to the skytrak boom

lifting plates and the skytrak do the heavy work
the roof panels are bearing on the outside wall and the center beams and are held down using very long screws.  its actually a pretty simple system and because we have a 45 degree pitch on the two sections of the house the whole thing fits together in a really clean and simple way.

moving the first roof panel into place

björn eases the panel down

the view from inside the kitchen as the panel comes down


the panel is in place
the vertical wood blocks keep the panel from sliding off the
side wall while it is screwed in place

making sure the panel is flush wit the exterior wall before screwing it into place
lucky for me björn waited to place the giant beam until I returned.  this monster spans the whole 30 foot great room and is a massive 9" wide by 18" high and weighs a ton (well not really but its heavy).  the skytrak had no problem picking it up and moving it into place.


matt guiding the beam into the pocket above the loft
the other side of the beam- a perfect fit 
working on the main house roof


there are more than 20 panels that make up the roof and you can see most of the process of putting them up here.  check back tomorrow for an update of the completed roof!

happy new year!

happy new year everyone!  björn and i were excited to ring in the new year here in durango and are anticipating an awesome 2012!

2011 was a great year for us, we started building a house, something we have dreamed about for a long time!  we were also fortunate enough to spend time with many of our favorite people in 2011, including our families in maryland, vermont and colorado.  we spent some time in mexico early in the year with björn's sister and husband, we traveled to colorado in june and beautiful lake tahoe in july to see friends get married and we spent some beautiful relaxing weeks in middlebury, vt designing our house!

i experienced my first earthquake in washington, dc this year as well as a hurricane, all before coming out to durango to start this adventure.  and it has certainly been an adventure!  we both look back to september when we actually started this project and are amazed at everything we have accomplished.  we have had some AMAZING help along the way and we couldn't have done it without the following people:

our family and friends for their continued support

kathleen mccormick (björn's mom) and jerry fields for their support and for putting a roof over our heads and feeding us delicious food, especially when we are too tired to even think about food

our neighbors in durango- for always being interested in what we are doing and for being our biggest cheerleaders

GM Construction- Guillermo Moreno, Israel, Mario, Oscar, Pilar- for all of their hard work building our rock wall and for Mario and Pilar our kick ass framers!

Carll Construction- Rob Carll for hooking us up with Guillermo and the boys, and for all your coordination.

Our guys at Alpine Lumber especially Dillon- for answering all of questions about lumber and fasteners and for putting up with our daily visits.

Our engineer Dave Wilson and everyone at Wilson Structural Engineering for making sure our house stands up and for suffering through "amateur hour" when we come visit with questions

Mark Yerbic at Big Sky Insulations for being awesome and always knowing the answer when it comes to SIPs.

And to all our other awesome crew, Matt, Mike, Emilio.  Thank you for working so hard for us!

There are many other people to thank and there will be many more to come so THANK YOU everyone!




{SHARE IT}

Related Posts Plugin for WordPress, Blogger...